[Android] 버튼 이벤트 구현해보기 2
| AndroidStudioProjects 작업폴더 위치
| C:\Users\user\AndroidStudioProjects |
| 입력란 태그
<EditText></EditText>
| 판떼기
<LinearLayout></LinearLayout>
| 제일 먼저 실행하는 문서

| 안드로이드에서는 인풋을 어떻게 사용할까
자바 : java.awt 임포트 <form><input>
안드로이드 : android.widget / classes 클릭 Button
| strings.xml
<resources>
    <string name="app_name">ARO</string>
    <string name="msg">tis Four</string>
    <string name="b1">imgC</string> //이미지변경
    <string name="b2">twoM</string> //문서이동
    <string name="b3">close</string> //닫기
</resources>
| activity_main.xml 변경전
<Button
        android:id="@+id/button1"
        android:layout_width="match_parent"
        android:layout_height="wrap_content"
        android:text="그림변경"
        android:textSize="10pt" />
| activity_main.xml 변경후
<Button
        android:id="@+id/button1"
        android:layout_width="match_parent"
        android:layout_height="wrap_content"
        android:text="@string/b1"
        android:textSize="10pt" />

    <Button
        android:id="@+id/button2"
        android:layout_width="match_parent"
        android:layout_height="wrap_content"
        android:text="@string/b2"
        android:textSize="10pt" />

    <Button
        android:id="@+id/button3"
        android:layout_width="match_parent"
        android:layout_height="wrap_content"
        android:text="@string/b3"
        android:textSize="10pt" />
| 출력결과
버튼 내용이 strings.xml 에 기재했던 내용으로 반영되었다.

| AndroidManifest.xml 로딩화면 바꿔주기
| android:roundIcon="@mipmap/ic_launcher_round" | android:roundIcon="@drowable/sw02" |
| 전 | 후 |
| MainActivity.java
- 버튼 2개추가해주기
- bt3.setOnClickListener
- it.putExtra("LG","cake"); 에서 name: 과 value: 는 직접 입력하는것이 아닌점에 유의
package com.example.aro;

import android.app.Activity;
import android.content.Intent;
import android.os.Bundle;
import android.view.View;
import android.widget.Button;
import android.widget.ImageView;
import android.widget.TextView;
import android.widget.Toast;

public class MainActivity extends Activity {
    TextView tv;
    ImageView iv;
    Button bt1, bt2, bt3;
    int my[]={R.drawable.apple, R.drawable.banana, R.drawable.melon};
    int cnt = 0;

    @Override
    protected void onCreate(Bundle savedInstanceState) {
        super.onCreate(savedInstanceState);
        setContentView(R.layout.activity_main);

        bt1 = this.findViewById(R.id.button1);
        bt2 = this.findViewById(R.id.button2);
        bt3 = this.findViewById(R.id.button3);
        iv = this.findViewById(R.id.myImg);

        bt1.setOnClickListener(new View.OnClickListener() {
            @Override
            public void onClick(View v) {
                iv.setImageResource(my[cnt]);
                cnt++;
                if(cnt==3) {cnt=0;
                    Toast.makeText(
                            MainActivity.this,
                            "3번째 그림",
                            Toast.LENGTH_LONG).show();
                }
            }
        });

        bt2.setOnClickListener(new View.OnClickListener() {
            @Override
            public void onClick(View v) {
                //two.java 문서로 이동
                //Intent it = new Intent(현재클래스, 이동할클래스);
                //Intent it = new Intent(MainActivity.this, two.class);
                Intent it = new Intent(getApplication(), two.class);
                it.putExtra("LG","cake");
                startActivity(it);
            }
        });

        bt3.setOnClickListener(new View.OnClickListener() {
            @Override
            public void onClick(View v) {
                String info = "어플을 종료합니다.";
                //구글 안드로이드앱에서는 클래스 이름들이 대부분 디저트 이름이다
                //확인버튼 없는 간단한 알림창
                //Toast tt = Toast.makeText(MainActivity.this, info, Toast.LENGTH_LONG); tt.show();
                Toast.makeText(MainActivity.this, info, Toast.LENGTH_LONG).show();
                finish(); //현재 Activity 창 닫기
            }
        });
    }//onCreate end
}//class end
| 안드로이드에서 화면에 보여주는 틀 = Activity 클래스, Activity 클래스의 자손들
android.app 팩키지
|- Activiti 클래스
| 조작이 가능한것들
android.widget 팩키지
|- Button, TextView, ImageView, Toast, LinearLayout 클래스
| xml에서 가장 많이 사용하는 속성들. 서포트해주는 아이들.
DTO역할 및 값전달, 액션, 전화를 걸때 등 사용.
android.content 팩키지
|- intent 클래스


| 안드로이드의 4대 구성
| Activity | Service | BroadcastReceiver | ContentProvider |
| 이 4대 구성 요소들의 연결을 도와주는 애가 intent. 안끼는곳이 없다.

| java
| com.example.aro 오른쪽클릭 - new - Activity
| MainActivity.java 클래스 상속 Activity

| two.java 만들기
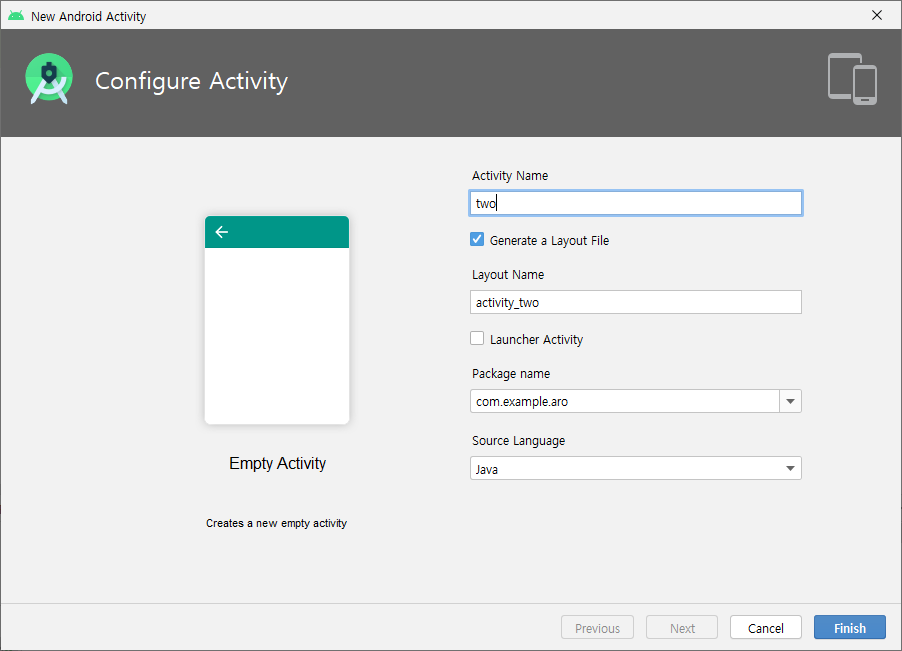
| two.java
package com.example.aro;

import android.app.Activity;
import android.content.Intent;
import android.os.Bundle;
import android.widget.TextView;

public class two extends Activity {

    @Override
    protected void onCreate(Bundle savedInstanceState) {
        super.onCreate(savedInstanceState);
        setContentView(R.layout.activity_two);

        TextView tv = this.findViewById(R.id.twoTv);
        Intent intent = this.getIntent();
        tv.setText("pinksky");
    }
}
| activity_two.xml
<?xml version="1.0" encoding="utf-8"?>
<LinearLayout
    xmlns:android="http://schemas.android.com/apk/res/android"
    xmlns:app="http://schemas.android.com/apk/res-auto"
    xmlns:tools="http://schemas.android.com/tools"
    android:layout_width="match_parent"
    android:layout_height="match_parent"
    tools:context=".two"
    android:orientation="vertical">

    <TextView
        android:id="@+id/twoTv1"
        android:layout_width="match_parent"
        android:layout_height="wrap_content"
        android:gravity="center"
        android:textSize="30pt"
        android:text="Two.java"/>

    <ImageView
        android:layout_width="match_parent"
        android:layout_height="match_parent"
        android:scaleType="fitXY"
        android:src="@drawable/pinksky" />


</LinearLayout>
| 이제 두번째 버튼을 누르면 문서가 이동된다.


| two.java
intent 로 값전달을 해보자
package com.example.aro;

import android.app.Activity;
import android.content.Intent;
import android.os.Bundle;
import android.widget.TextView;

public class two extends Activity {

    @Override
    protected void onCreate(Bundle savedInstanceState) {
        super.onCreate(savedInstanceState);
        setContentView(R.layout.activity_two);

        TextView tv = this.findViewById(R.id.twoTv); //twoTv라는 아이디를 가지고 있는 텍스트 뷰를 찾는다.
        Intent intent = this.getIntent();
        tv.setText("pinksky"); //텍스트뷰에 텍스트를 삽입한다.

        tv.setText(intent.getCharSequenceExtra("LG")); //텍스트뷰에 LG 값을 삽입한다.
    }
}
| 아까 MainActivity.java에 입력했던 값
bt2.setOnClickListener(new View.OnClickListener() {
            @Override
            public void onClick(View v) {
                //two.java 문서로 이동
                //Intent it = new Intent(현재클래스, 이동할클래스);
                //Intent it = new Intent(MainActivity.this, two.class);
                Intent it = new Intent(getApplication(), two.class);
                it.putExtra("LG","cake");
                startActivity(it);
            }
        });
| 출력 결과
텍스트가 bluesky 에서 cake 로 바뀌었다.
